
Job Entry Screen
This is how the job entry screen looks like. It has the menu options like the other windows programs: File, Edit, View and help, and the toolbar with the new features. The File menu contains the following options: Prior/next Job: it finds a previous job or following job, than the current one. You can also use the page Up and Page Down keys
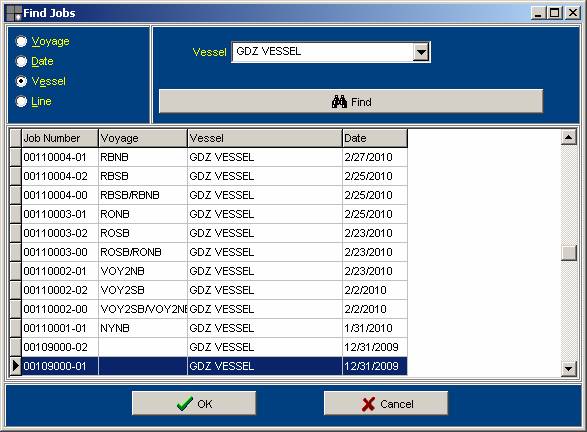
Find Job: this is a new feature that allows users to find jobs, by Voyage, date or vessel
New Job, will clear the screen to allow the user to start the creation of a new job
Save Job; will save any changes made, for example changing a vessel’s name
Cancel/Edit
Add port: it allows the user to add a port to the existing list.
Exit; Closes the job entry screen
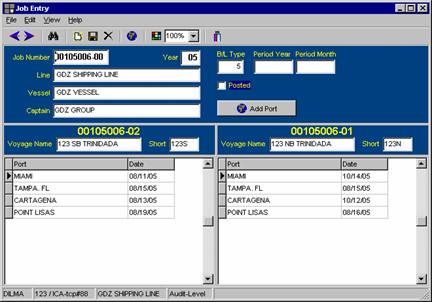
The Job Entry screen program is made up of the following sections:
1. General information: contains the basic information about the line, vessel, captain, year and the job number. The Bill of lading numbering type is defined at this point, and it is customer specific, or 0 (zero) if manual numbering. There is a new feature: the period year and period month fields. This means that the Bills of lading will be posted on the period that is defined on this screen. It has an additional field called Posted. When this field has a check mark, it means that all the B/L’s for this job have been posted and have accounting information. If a correction takes place, there will be an additional note in the invoices, stating such correction. It has an alternate sequence option, in case the user needs the job to have a different sequence than the regular one. At the end there is a field to add a port, if needed.
2. There is an option to create job numbers with a different sequence number. Alternate job number may be selected and a number out of the regular sequence will be created. This is customer specific, and the starting number has to be predefined
When looking at a –00 job, you will see the screen that appears on the picture below (first picture of the document, as you move to 01 and 02, only the corresponding branch will be displayed
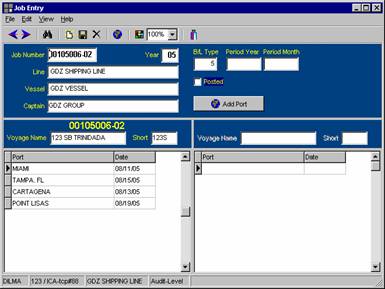
3. The 02 Section (Southbound): This section is on the left side and appears with the list of ports that have been defined in the sailing schedule for the selected vessel. In the right column, the dates on which the vessel touches (either arriving into or sailing from) those ports will be assigned. It also shows the voyage name/number
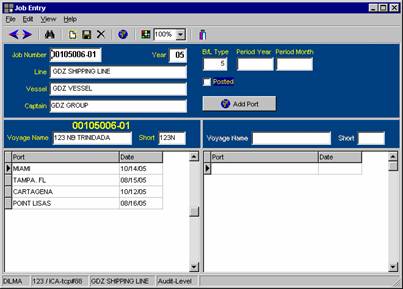
4. The 01 Section (Northbound): This section is on the right side and shows the same list of ports that have been defined in the sailing schedule for the selected vessel. In the right column, the dates on which the vessel touches those ports will be assigned.
To make any changes on a date, simply click on the corresponding port and assign the desired date. To change the name of the vessel, go to the vessel field and select the desired one. In this case, if you want to change the vessel for the two branches SB and NB, select the 00 job. If you want to change only one of the branches: Select 02 for Southbound and 01 for Northbound.
To create a job, just assign the information in every field.